Home
Introduction
Learning Goals
Module Layout
Equipment
Module 1
Overview
Develop The Position
The Base
The Shoulder
The Body
Practice Your Skills
Module 2
Overview
Develop The Position
The Base
Upper Body Position
Practice Your Skills
Module 3
Overview
Develop The Position
The Base
The Body
Adjust The Position
Hand Positions
Practice Your Skills
Module 4
Overview
1. Aiming
2. Natural Alignment
3. Breathing
4. Trigger Control
5. Follow-Through
Practice Your Skills
Share
Share Your Skills
Conclusion
Conclusion
Module 3: The Standing Position
The Body
There is a natural bend in the back which helps lock the vertebra and increase the use of ligaments so muscles are not used.
The shoulders are relaxed.
The elbow should sit in the exact same position on the hip for every shot.
The weight of the rifle makes a straight line with the arm, hip and legs for maximum bone support as seen in figure 1.
The athletes centre of gravity is in the middle of the feet.
The centre of gravity of the rifle should sit slightly forward of the left foot.
The centre of gravity of the body and rifle sit just slightly to the left of centre of the athletes centre of gravity, as seen in figure 2.
The athlete can redistribute the weight on the rifle or adjust their body to move their centre of gravity.
Figure 1: Alignment of the bone structure supporting the weight of the rifle
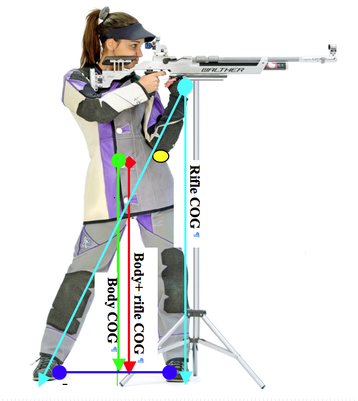
Figure 2: COG = Centre of Gravity
Home
Introduction
Learning Goals
Module Layout
Equipment
Module 1
Overview
Develop The Position
The Base
The Shoulder
The Body
Practice Your Skills
Module 2
Overview
Develop The Position
The Base
Upper Body Position
Practice Your Skills
Module 3
Overview
Develop The Position
The Base
The Body
Adjust The Position
Hand Positions
Practice Your Skills
Module 4
Overview
1. Aiming
2. Natural Alignment
3. Breathing
4. Trigger Control
5. Follow-Through
Practice Your Skills
Share
Share Your Skills
Conclusion
Conclusion